EECS110 Course
Project Option 3, Spring 2018
The pyRobot Project
In this project you will program a simulated robot to
navigate through its environment.
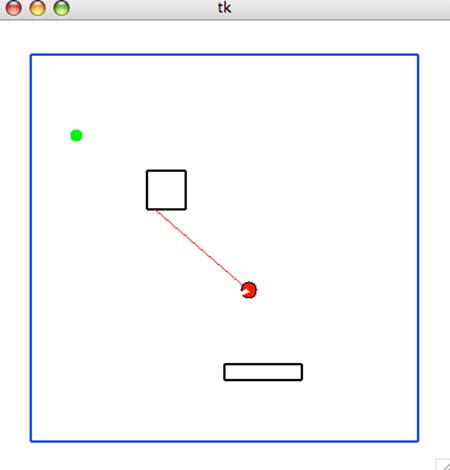
The screenshot above shows the actors in this
simulation. The red circle is the robot. The red line emanating from it is its
laser rangefinder that can be pointed in any direction. The green circle is the
goal point, which can be set by clicking with the g
key held down. The walls are blue and the obstacles are black.
At each time step, the robot senses its environment,
including the distance it reads from its range sensor, its global position, and
its bump sensors (in case it hits a wall). With that information, your program
should decide on the appropriate task (or "state") for the robot to
execute. Based on the robot's task or state, in turn, it should decide what
velocity it should set for itself.
You should design and implement an algorithm that will
successfully and repeatedly enable the virtual robot to navigate from its
current location to a user-specified goal. In particular, you should assume
that the room will be square and there will be some number of random objects
which are rectangles whose axes are parallel to the sides of the square. Your
robot must be able to autonomously navigate to the goal object, no matter where
it is placed in the room. You may assume that these rectangles will be
separated by a "reasonable" distance from one another so that the
goal object is always reachable! There are many possible algorithms for
reaching the goal. Your algorithm does not need to follow the shortest possible
path, but it should guarantee that it will always get the robot to the goal in
a finite and reasonable amount of time. (For example, random wandering is too
slow and unreliable, and thus not a satisfactory solution.)
If you are using a version other than Python 3.5 download and unzip the pyRobot.zip
file from this link.
IMPORTANT: If you are using Python 3.5, please download pyRobot_3-5-1.zip and use it
instead.
This package contains all the infrastructure that you
will need. The file that you will be altering is pyRobot.py. Do not alter the other support files.
You should be able to run this program by running pyRobot.py from IDLE. In case, for some reason, the
graphics do not work well from IDLE on your computer, you may wish to run the
program from the command line as shown below:
Change directory in to the pyRobot folder and then run from your command line
(Mac in this case):
% python pyRobot.py
or, if you're using windows and python isn't in your
path, you'd type
> C:\python35\python pyRobot.py
You should see a window appear and the simulation will
already be running.
Start by playing with the program. When you first
invoke the program, you will be prompted to enter a map number. There are three
maps that we've supplied. Map 0 is an empty room, map 1 has two rectangular
obstacles, and map 2 has more obstacles.
Note that there are several windows that open when you
run the program. One is the robot simulation window. Another is the IDLE or
command line window where all of the print statements will be displayed. You
may also see a "Console" window which you can ignore.
Use the mouse to point to a location on the python
robot window. Hold the "g" key down and click with the mouse button.
This will set the position of the goal object. On the Macs, you may need to move the robot window
around a bit before this will work correctly.
Now, drive the robot around manually. Here are the keys
that have been defined:
- "i"
moves forward at top speed.
- "k"
moves backward at top speed.
- The space key
stops the robot.
- "j"
rotates the robot counterclockwise at top rotational speed.
- "l"
rotates the robot clockwise at top rotational speed.
- "r" rotates
the laser rangefinder counterclockwise 5 degrees.
- "R"
rotates the laser rangefinder clockwise 5 degrees.
Notice that the laser rangefinder is fixed relative to
the orientation of the robot. So, as the robot turns, so does the rangefinder.
However, the rangefinder can also be turned without turning the robot itself
(as you see when you use the "r" and "R" keys).
You will also notice that, at the moment, the robot can
drive right over the goal object and the program won't detect it.
In order to stop the program
you can type "Q" in the robot simulation menu or Control-C or
Control-D in the IDLE or command line window. Some computers may not recognize
one of these but should recognize the others.
Manual
Control
Take a look at the code in the file pyRobot.py. It has quite a few comments that you should
read carefully. You will notice that the robot has a set of states that are
specified by numbers, but each state number is given a name as well. The
starter code that we have provided has five states. There is a variable called state that keeps track of the
current state of the robot. This state is initially 1 (also
called KBD) indicating that the robot
begins in a state in which it is being manually driven by a human user via the
keyboard.
The program enters an infinite loop (you'll see the while True statement that runs this loop). Inside that
loop, the simulator obtains the robot's current x and y coordinates, its
heading (thd)
in degrees, and the values of its bump sensors. These sensors evaluate to True when they press up against a wall. You'll
see this a bit further down in the code.
Skip down to the part of the code with the line
if state == KBD
The program begins with state equal
to KBD so this condition will be True initially. The variable key is the name of the key
that was just pressed by the user (if a key was, in fact, pressed). Notice that
if the key was "i" then the command self.setVels(FV, 0) is invoked. This sets the robot's forward
velocity to FV the maximum permitted
forward velocity. Notice that FV was
set earlier in the program to be the maximum forward velocity. The second
argument of setVels is the rotational velocity
for turning the robot. Notice that RV was
defined earlier in the code to be the maximum rotational velocity. When we
press "j" or "l" we turn the robot counter-clockwise or
clockwise, respectively.
It is important to notice that once the robot's forward
or turning velocity are set, the robot will keep moving according to these
velocity values until some action is taken to change the robot's course. In
other words, the self.setVels command can be viewed as
setting the robot's motors and these motors will maintain their velocity
settings until the settings are changed by a later self.setVels command.
In other words, the robot will continue moving
according to its current velocity settings even if we were to somehow leave the while loop. The while loop
is only used to decide what state to enter next based on the robot's current
location, sensor inputs, and possibly keyboard input.
Finally, take a look at the other key presses that are
defined for KBD state. We can turn the
laser rangefinder (without turning the robot!) using "r" and
"R". Experiment with all of these manual controls and take a look at
the corresponding code in the program so that you understand how this all
works. The "s" key does something special. More on that next!
Move the goal to some location other than it's initial
default location (which is right at the origin where the robot starts). To do
this, move the mouse to the desired location and press the "g" key.
On a Mac, you may need to first move the robot window once or twice before this
will work.
Now, press the "s" key. Notice in the code
that pressing "s" changes the state of the robot from KBD to the state GO,
which, you will notice, is just another name for the number 3. This is state 3,
but giving it a meaningful name like GO is convenient.
Now the robot is in the GO state
and NOT in the KBD state. This means that
pressing keyboard keys will not control the robot. (However, pressing the space
key will return the robot to the KBD state so that it is back
under manual control. Do you see where in the code we made this happen?).
What happens in the GO state? Take a look a bit
further up in the code in the line that begins with
if state == GO
Next time through the while loop, the robot will hit
this statement and activate this piece of code. In particular, it sets the
rangefinder to point 0 degrees away from the heading of the robot (in other
words, in the direction of the robot's movement). It then checks to see if the
robot has gotten close to a wall (the range distance is within 2 times the
radius of the robot). If so, it changes state again to the TURN state. Otherwise, it sends a message to the
robot to move full speed ahead.
Now for the TURN state. This state sends a
message to the robot to start turning at maximum rotational velocity. It then
sets a variable called pause_stop to be 3 seconds beyond the
current time. It sets another variable called nextState to be the GO state.
Finally, it enters state
GOFOR. As we will now see, this
will have the effect of forcing the robot to stop turning in 3 seconds and then
enter the GO state.
GOFOR is an interesting state. Notice
that its block of code simply checks to see if the current time, time.time() has exceeded the time pause_stop. If so, it sets the state to nextState which is currently GO.
Notice that we have provided some very crude autonomous
control through the GO, TURN, and GOFOR states. Your task is to design an algorithm
for the robot to autonomously find the goal and to implement new states that
implement your algorithm. Here are the requirements for your pyRobot program:
- Your program should
autonomously
(without the human driving it!) direct the robot to reach any goal the
user clicks on within the three provided maps. In fact, your program
should be sufficiently robust to direct the robot to the goal object in
any room with rectangular obstacles whose edges are parallel to the room's
walls and there the rectangles are spaced sufficiently far apart. We may test your robot on a
different map than what we've provided you in order to ensure that your
program is sufficiently general.
- Your robot
should start running autonomously when the user presses the "s"
key.
- The robot
should stop and report that it has reached the goal when it has actually
reached the goal.
- As it runs,
your program needs to print messages that will help an onlooker understand
what is going on. In particular, your program should keep the user aware
of its current state as follows:
- Print a
message whenever it changes state, i.e., its current subtask. The message
should indicate the state that the robot is changing from and the state
that it is changing to
- Print a
message and stop when the robot gets within 16 units (the robot's radius
in centimeters) from the goal location
- Print any
other messages that someone unfamiliar with your program might need to
better understand what is happening. However, try not to flood the user
with messages!
You'll notice in the simulator that we get the robot's
x- and y-coordinates, its heading (thd) and, other sensor readings from the
robot. You may be inclined to set these values. However, these are sensor
values that the robot obtains and not
values that can actually be changed by simply assigning them values. You can
only change the robot's position by issuing movement commands through the setVels function, which sends information to the
robot's motors.
A Note on Reducing the Number of
States
You may find that you need to implement many different
states, some of which do more-or-less the same thing. This is OK. However,
there are a number of ways of reducing the number of different states and
keeping your code quite short and simple. For example, some tasks may comprise
a sequence of smaller tasks. You might have a state for each small task. Then,
the big task could simply make a list of the smaller tasks that need to be
performed to accomplish the big task. The first small task would be removed
from the list and executed. When it is done being executed, the next state to
be executed would be taken from that list! By using lists of tasks, you can
save quite a bit of coding.
What to Submit for the Intermediate
and Final Submissions
There are two submission deadlines. By the Intermediate
Deadline on Sunday, 06/03 at 11:59 PM
you should submit the following:
- A text file
called
pr3_milestone.txtcontaining:
o
Your name (and your partner's name if this
is a pair submission)
o
The project that you've chosen (pyRobot in
this case)
o
A section entitled "Description of the
Approach". This section will normally be 2-3 paragraphs long. This section
should describe, in detail, the process or "algorithm" that the robot
will use to navigate from its starting point to the goal point (wherever that
might be). Your plan should be general enough to handle any room with
rectangular obstacle whose edges are parallel to the walls of the room and that
are spaced sufficiently far apart.
·
A file called pr3_milestone.py (renamed from pyRobot.py)
that contains a working solution for maps 0 and 1. Your code might not
implement your complete algorithm yet, but it should implement enough of your
algorithm to handle any goal location in these two maps.
·
Submit your pr3_milestone.txt and pr3_milestone.py files at Canvas.
Final submissions are due by 11:59 PM
on Sunday, 06/10.
For the final project
submission, you should submit the following:
- A text file
called
pr3_final.txtcontaining: - Your name(s)
- The project
that you've chosen
- "Description
of the Approach". This section will normally be a few paragraphs long.
The section should describe, in detail, how the robot will navigate from
its starting point (wherever that might be) to the destination point
(wherever that might be). This might be a verbatim copy of the text that
you wrote for the milestone, but it's likely that some changes were made
between the milestone and the final project, and thus you are likely to
have more thorough and detailed prose in this document.
- Your final
python program (that works for all maps with rectangular obstacles
parallel to the walls and sufficient space between these obstacles) in a
file called
pr3_final.py. - Submit
all of your files at Canvas .
Some
notes about the design, implementation and testing of your code:
- Design your
code carefully. It is highly recommended that you do this on paper first.
Make sure that your functions and classes encapsulate small logical
components of your larger program.
- Please be sure
that you provide a docstring for every function and method that
you write.
- Where your
code is at all complex, please provide some comments in the code to
explain what's happening.
- Use good and
descriptive variable names.
- Avoid global
variables except where they are absolutely necessary (and that's not very
often!).
- Avoid magic
values!
- Test your code
thoroughly.